Funky looking cloth wipes

I made up these wipes for my four year old to use after he's pooped. We had him using those pre-moistened toilet wipes, but dang, they are expensive and he always used 4 or 5 to get the job done right. Plain old toilet paper never seemed to cut it with him.


Photobucket

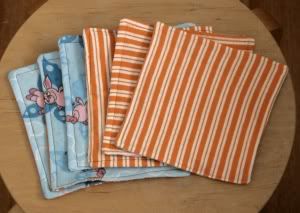
These are leftover flannelette scraps, turned and top stitched. As far as laundering them, they go in with the cloth nappies, so no extra laundry and he's now quite happy to wipe himself, and I of course, don't care how many wipes he uses.

Have you heard of family cloth ?

I'm not quite willing to go there completely yet, but these cute little numbers are doing their part in bringing our grocery bill down.
And my four year old is fresh as a daisy. Well, as fresh as a four year old boy can be, anyway!


Home made tortillas, by hand or thermomix

Tortillas are one of those things I used to buy and keep in the cupboard until needed. That should have been warning enough, and after reading the ingredients list I can see why they keep so well.......they are barely a food at all. Well, slight exaggeration perhaps but here is what is in the ones I used to buy:


Wheat flour
Water
Vegetable oil
Humectant
Salt
Emulsifiers
Raising agents
Dextrose
Preservatives
Colour
Food acid
Flour treatment agent
Antioxidants


And this is what is in the ones I made last night:


Tortillas

320grams plain flour
1 teaspoon salt
3 tablespoons olive oil
1 teaspoon baking powder
180 grams/mls warm water

Much better for you surely, without all the extras in the list above.
And they taste sooooo good, they are well worth the little bit of fiddle it takes to roll them out.


Ok, here's how to:

Mix all ingredients in a bowl, turn out and knead for 10 minutes.

Thermomixers: throw it all in the TM bowl, mix for 10 secs to combine, then knead for 3 minutes.

Rest the dough for 5 - 10 minutes.

Enlist a helper (not strictly necessary)

Photobucket

Divide dough into 12 pieces

Photobucket

Roll each piece flat into rounds, or any odd shape, as long as it's as thin as you can get it.

Photobucket

Fry in a hot frypan until the upper surface starts to pucker and puff a bit.

Flip over, cook briefly on other side.

You'll be able to tell when they're done by sight, and they should cook pretty fast.
If not, turn your pan up a wee bit.
I use a scanpan, which is non-stick, so I oil it up at the start and that's it.

Once cooked, I put a teatowel inside a large ziplock type bag and lay each tortilla as it is cooked onto the teatowel in a pile. I then seal the bag while the next one's cooking. This method keeps them soft and flexible.

Do try these, you won't regret it, the taste is fantastic, there is no throw-away plastic packaging, they're cheaper than store bought and my recurring theme, you know exactly what's in them.

Kidzwear Factory Outlet

For an extra 10% off sale items at the Kidzwear Factory Outlet online store, enter 'grapevine10' in the coupon section at checkout.

Woohoo, winter sales are on everywhere!


Making your own cloth nappies? 15% off storewide!

Nappies Covered is an online store selling everything you could possibly want or need to make your own nappies.

And for 15% off store wide, just enter this coupon code MGV09 at checkout.

Check out the sale items section for an even bigger discount and there is also a remnants and seconds section where offcuts the right size for boosters etc are sold in packs.

Ooooh, oooh, oooh, nappy nirvana!


Kidz Brandz winter clothing clearance

Kidz Brandz at www.kidzbrandz.com.au is having a winter clearance, with all winter stock heavily reduced. Worth a look to see what you can pick up cheaply for next winter. Be sure to check out the 'seconds' category, or 'secondz' as they call it, for items that may need a little tlc but are even more heavily reduced than the rest.

Sale ends 5th September.

Oh, and they sell Gap pjs for the little guys. In my humble opinion, Gap pjs are the best jammies around, I'm always on the lookout for them as my 4 year old refuses to wear any other sort, sigh...


Fingerpaint - how to make it (and how not to)

In an effort to get the kids out from under hubby's feet a couple of weekends ago, I thought I'd give them a go at finger painting. Given our small house, this needs to be an outside activity, the small house being the reason needed to get them out from under hubby's feet.

Ever have those days when you feel you just can't get away from people, and the noise and activity level is enough to just about send you over the edge?
Well, a small house, a cold day, two small, energetic, LOUD boys, and all four of us home because it's the weekend = a recipe for afternoon angst.


So, a quick Google for recipes as it's been a loooong time since I made finger paint when I worked as a nanny. I came up with a cooked version involving cornstarch or cornflour as we call it Down Under, and a quick mix-it-and-use-it version involving flour and water. As I wanted to get the kids outside asap before an explosion happened, I went with the quick version.

Word of advice: do not use a flour and water paste for finger painting.
At least, not if your kids are four and 15 months and are not the sort to sit quietly and finger paint on a piece of paper in front of them.


We got outside, hands were tentatively dipped in, then Mr 15 months flicked his everywhere in an effort to the gloopy stuff off them. Right, washing off the line, pronto. Continue.

Anyway, you can see the results....

Photobucket

Photobucket

Photobucket

This gloop set like stone on the bricks and on the kids hair. Mr four has a #4 haircut so not much problem there, but Mr 15 months has floaty blonde baby hair and he managed to slap a few handfuls of the stuff on top of his head for I know not what reason. After two shampoo washes enough remained that I ended up cutting it out in clumps after a few days. The clothes all went in the washer for an extended go and I had a half-hearted scrub at the bricks but they remain largely blue splattered.

So, next time I plan to try this recipe, or even this one, though I'm not sure I want my kids eating their finger paint so I wouldn't put sugar in as suggested.

This one suggests using yoghurt, which might be a good idea for the very young who of course have a tendency to eat everything anyway.


Oh well, live and learn, right?
At least the bub is too young to be concerned about his now peculiar looking hair....


Homemade chocolate spread........aka Nutella

Well the Nutella turned out pretty well, if not as thick as I remember the shop bought product being. If I make it again, I would probably reduce the amount of milk somewhat to make it a little thicker.

This recipe is actually from my thermomix book, but if you have a decent blender or food processor for grinding the hazelnuts, I'm sure it can be made the conventional way. I'll convert it to how I think it will best be made without a thermomix.


Hazelnut chocolate spread

90 grams of caster sugar
(can be reduced to 50 grams, I used 60 and that seemed plenty to me)

60 grams of hazelnuts

100 grams plain chocolate, in pieces

70 grams butter

100 mls milk
(Next time I'll try about 70 mls)

  • Pulverize the nuts till they are as finely ground as you can get them.
  • Place butter, sugar and milk in a pot. Heat gently while stirring, until butter melts.
  • Add chocolate. Stir until chocolate melts.
  • Add hazelnuts. Cook on a low heat for about 6 minutes, stirring until mixture is a smooth consistency.
  • Store in a jar in the fridge. Keeps for 14-21 days.


Tasty on toast, bread, gingerbread cookies or just on a spoon.
Those are the ways we've eaten it so far, the kids are loving it.


Just found another version of this I'd like to try, this recipe being specifically trialled by someone without a thermomix. I like the idea that the writer was able to mix it to a thick creamy texture, unlike mine which had to set in the fidge. Hmmmmm....

Maybe I'll make these with mine, Nutella Cheescake Brownies, at Alpineberry

Photobucket

because how good do they look??

And use that as an excuse to try another batch of nutella....shhh, don't tell!


Make your own peanut butter

In my ongoing attempt to green up my family's life and leave behind as many preservatives and additives as possible, I thought I would try making my own peanut butter. I love peanut butter by the spoonful and the kids eat it on their sammys.....not their daycare ones though, of course. But I find commercial peanut butter far too sweet and depending on what brand you buy it has various things added to it apart from the basics.

Now if you ask Master Chef Google how to do this you will come up with many similar answers.

Peanuts, oil, no oil, salt, sugar, honey........hmmmm.


Well, I did it this way:

I used my Thermomix, though I presume any half decent food processor would the job.
Into that I added 500 grams roasted, un-salted peanuts.
I blitzed these until I they were very very finely ground. At this point some of my searches had said my peanuts should turn to a paste and bind together. Well, mine didn't.
So I added a splash of olive oil - peanut is recommended but I didn't have any, and blitzed again. Better.
Another dribble of oil and blitz again.
Ok, looks good now, paler than commercial peanut butter but the correct consistency.
Taste. Hmmm, a bit.....bland?
Add some salt. Mix. Better.
Add a bit more salt. (Confession, I like my food salty, great for my health I know) Mix.
Just right.
Store in recycled glass jar in fridge, where it should keep for 2-3 weeks.

Only I'm not sure even I can eat that much p/b in 2-3 weeks.


Photobucket


On the left is home made nutella, which I also made today, much to my 4 year old's delight. Nutella is not something I buy, ever, but I had a recipe and wanted to try it. Preliminary tastings were promising, though it had to go into the fridge to set, so I haven't tried it out since then.

I'll keep you posted on that one....


Ha, you can now tell exactly how lazy I am, my peanut butter is labeled Archibald's honey and my nutella is some sort of mayo. I just cannot be bothered soaking labels off jars. Laaazzzy, yay me!


Homemade sidewalk chalk

I thought this was a lovely idea, a use for all those toilet roll tubes that you save but are not allowed to donate to pre-schools any more.

Photobucket

We go through quite a bit of chalk, the kids love decorating the driveway with all manner of creations and the younger one still enjoys chewing it, heaven only knows why. The only thing I need to do before I embark on this project is find out if plaster of paris is safe for chewing. If not, it will a four year old only activity, I know he's going to enjoy actually making the stuff, any excuse to get filthy...

Photobucket

See what I mean? This particular photo will come up again soon as a "how not to....." tutorial. We all have to make mistakes, right? Hahaha, it was funny though....I digress, back to the topic in hand:

Here it is, How to make sidewalk chalk, at Mad Maggie Designs.

Reading through the comments, it could be fun to try out some other odd shaped molds, and be sure to use tempera paint.

Also a good idea for a homemade gift, I know my boys would enjoy some personalized chalk. Especially if it has flavouring added, ha!